ALERT!
This site is not optimized for Internet Explorer 8 (or older).
Please upgrade to a newer version of Internet Explorer or use an alternate browser such as Chrome or Firefox.
Minimally Invasive Esophagectomy: Tips and Pitfalls
Irshad K. Minimally Invasive Esophagectomy: Tips and Pitfalls. June 2018. doi:10.25373/ctsnet.6493289.
In this video and article, the author details tips and tricks to help practicing surgeons complete a minimally invasive esophagectomy.
Position of the Patient
The patient lies supine on the bed with a foot rest. This will secure the patient well, especially when a steep reverse Trendelenburg position is required. The patient is placed flush to the right side of the bed. This position adds to the comfort of the operating surgeon and makes the liver retractor more mobile.
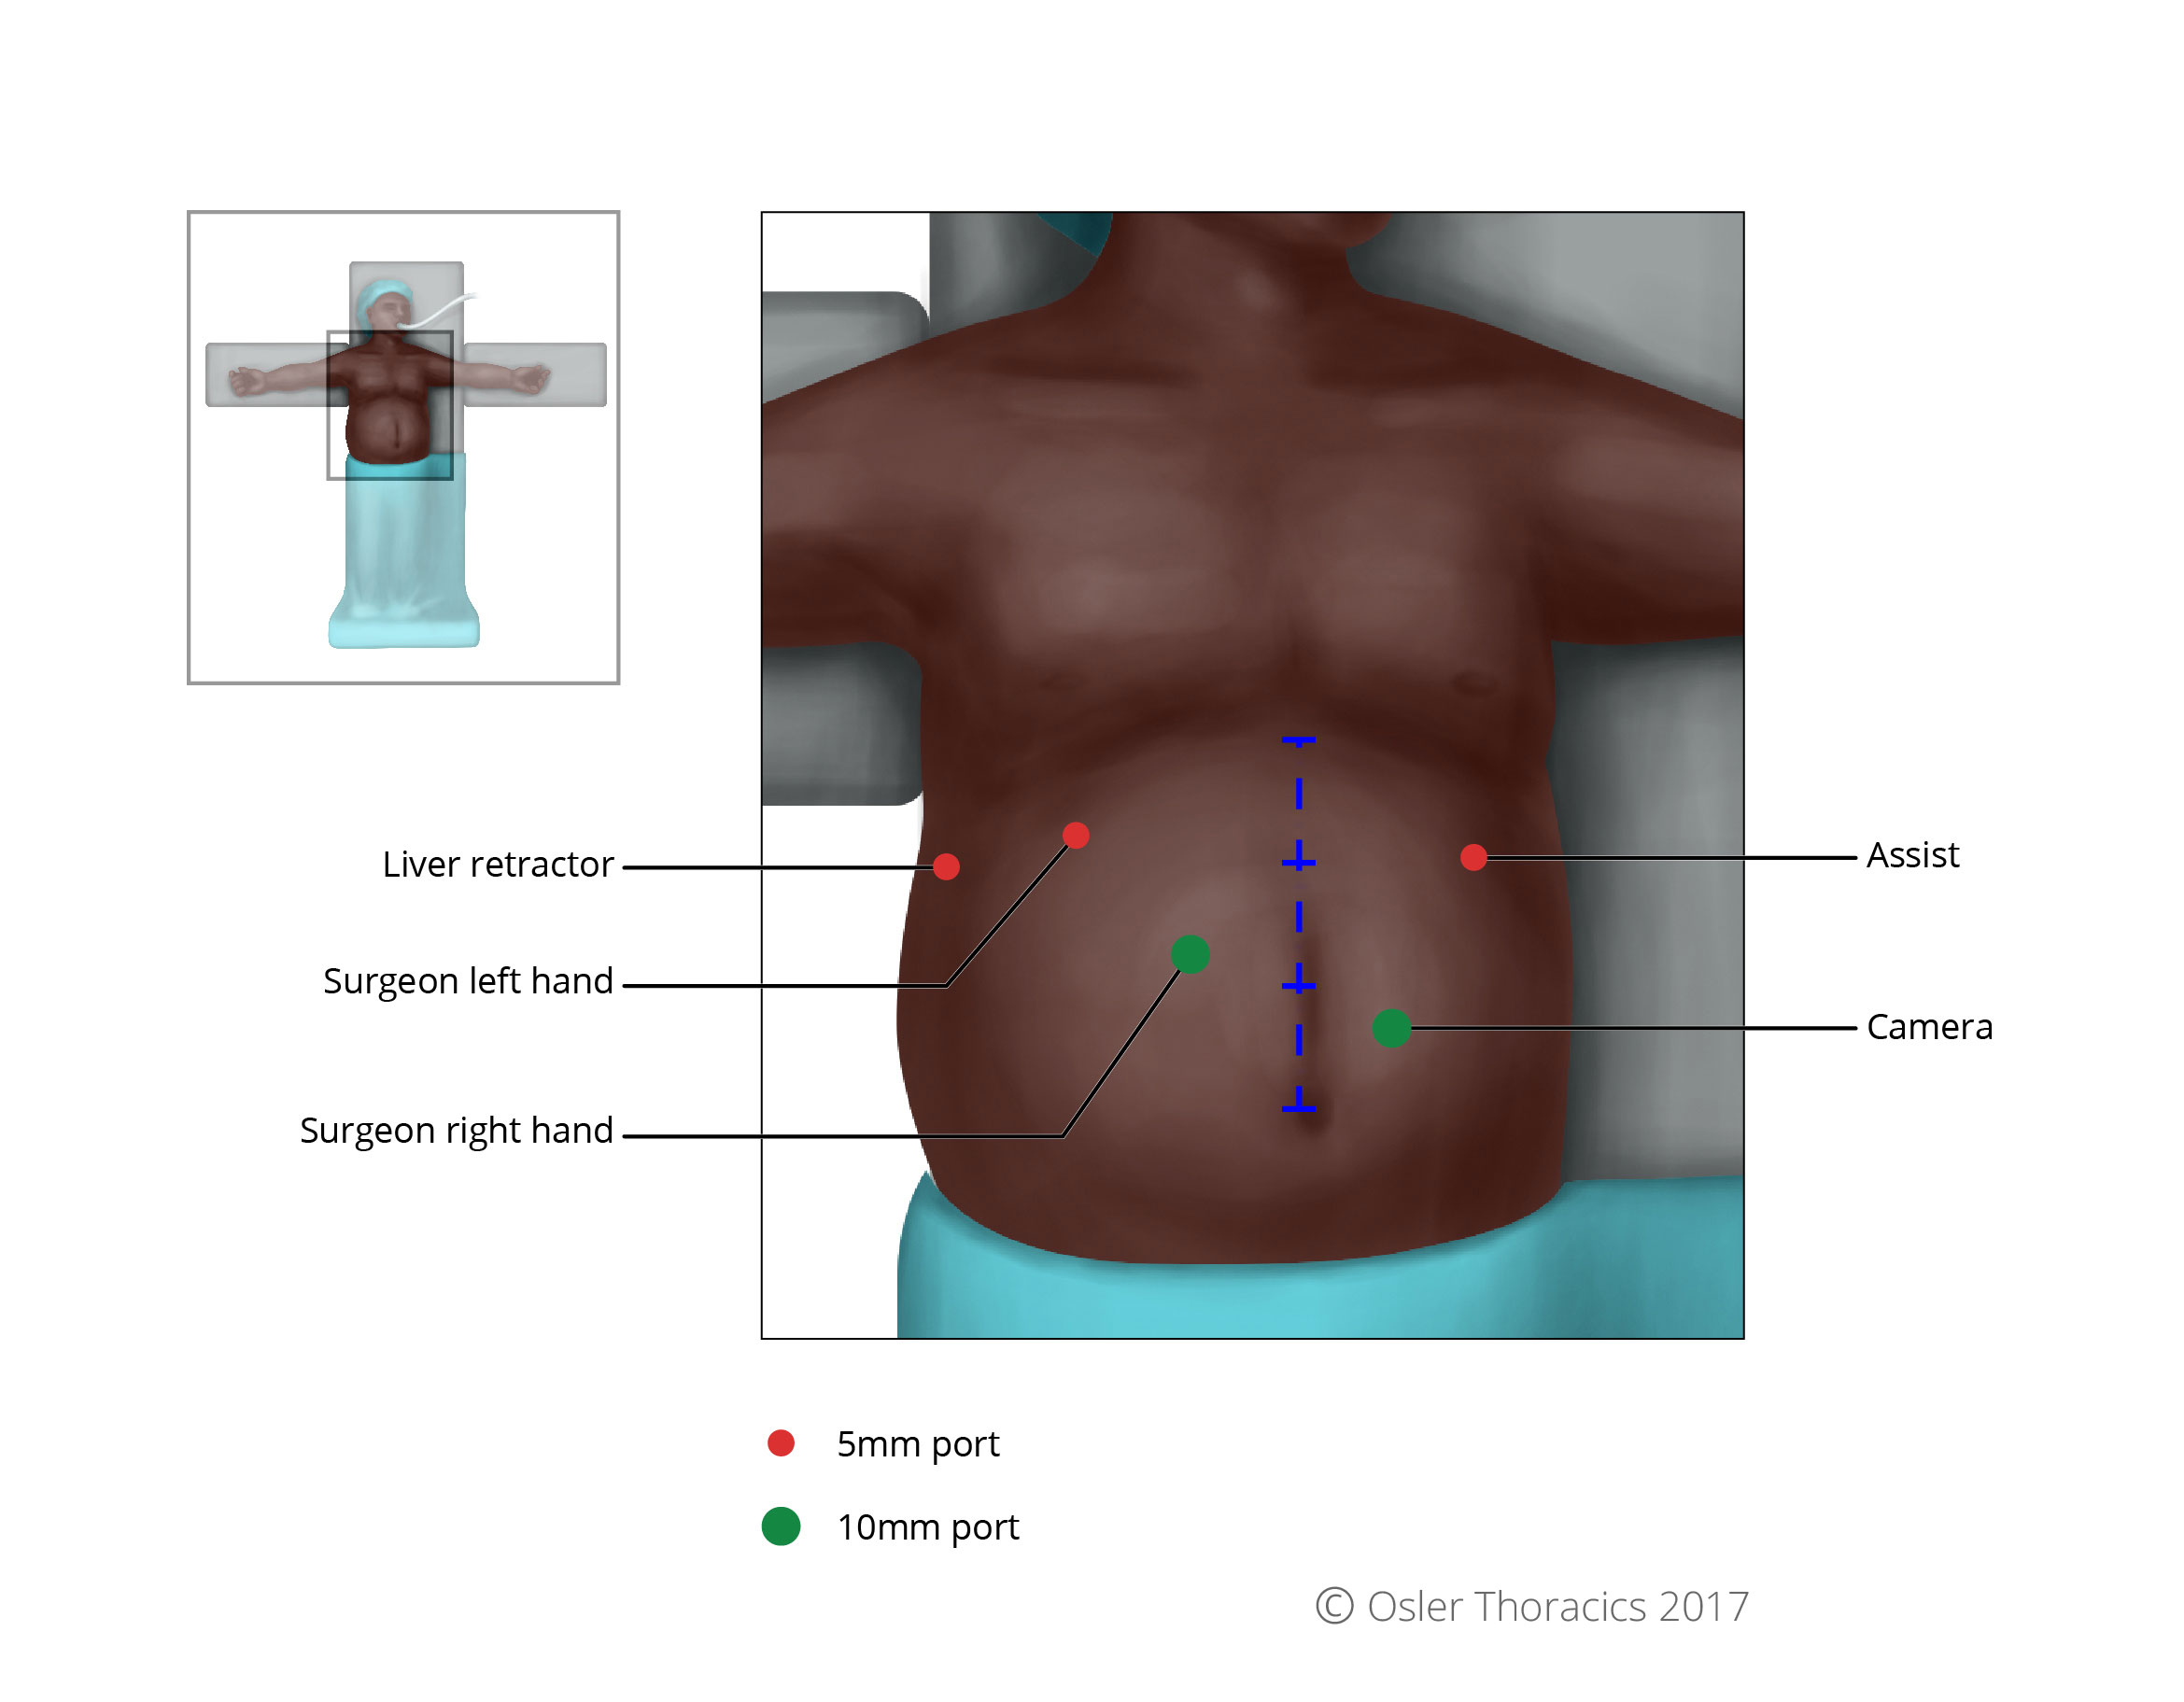
Port Placement Pearl: The Rule of Thirds
Mark the patient:
- Subcostal margin, xiphoid, falciform
- Line from xiphoid process to umbilicus, divided in three
- Camera port: two fingerbreadths below mark 2
- Working port right of surgeon: at mark 2
- Rest, same as Nissen
- Right lower quadrant (RLQ) port: The author calls this the feeding tube and conduit port. It will allow one to suture the feeding tube to the abdominal wall and also helps maintain a straight conduit.

The advantage of a minimally invasive approach is the ability to carefully assess the peritoneal cavity prior to resection, with minimal trauma to the body. The author will spend a few minutes examining the liver, omentum, and abdominal wall prior to resection. Any suspicious lesions are biopsied and sent for frozen section evaluation. This prevents futile resections in those with unsuspected metastatic disease.
Step 1: Hiatal Dissection
Pearl: Reduce the Hiatus Hernia
The author begins this dissection like they do in patients with a hiatus hernia. As the most common cause of esophageal cancer is chronic gastroesophageal reflux disease, it is not surprising that many patients have hiatal hernias. Using the “anterior sac approach,” the author reduces the stomach. This will allow for using more of the stomach to create the conduit.
- Tip: After the hiatus is reduced, the author mobilizes the fibers at the angle of His. Like in all foregut procedures, this makes short gastric mobilization easier as it allows for more mobility of the stomach and improved exposure of the vessels.
- Tip: The author performs minimal esophageal dissection at this time. As many patients have had radiation treatment, the dissection planes between the periesophageal tissue and the pleura are often obliterated. Inadvertent pleurotomies will result in a floppy diaphragm, which can be very bothersome for the rest of the procedure.
Step 2: Mobilization of the Stomach
Pearl: Mobilization With Minimal Grasping of the Stomach
Grasping trauma to the stomach is a common criticism of the minimally invasive esophagectomy (MIE). During an open esophagectomy, the stomach is frequently manipulated by the hand, which minimizes iatrogenic trauma. Without this luxury, overly aggressive grasper manipulation can lead to a beaten-up conduit with significant microvascular trauma. This may lead to leak and/or vascular ischemia. To avoid this, the author prefers to use a minimal touch technique to completely mobilize the stomach.

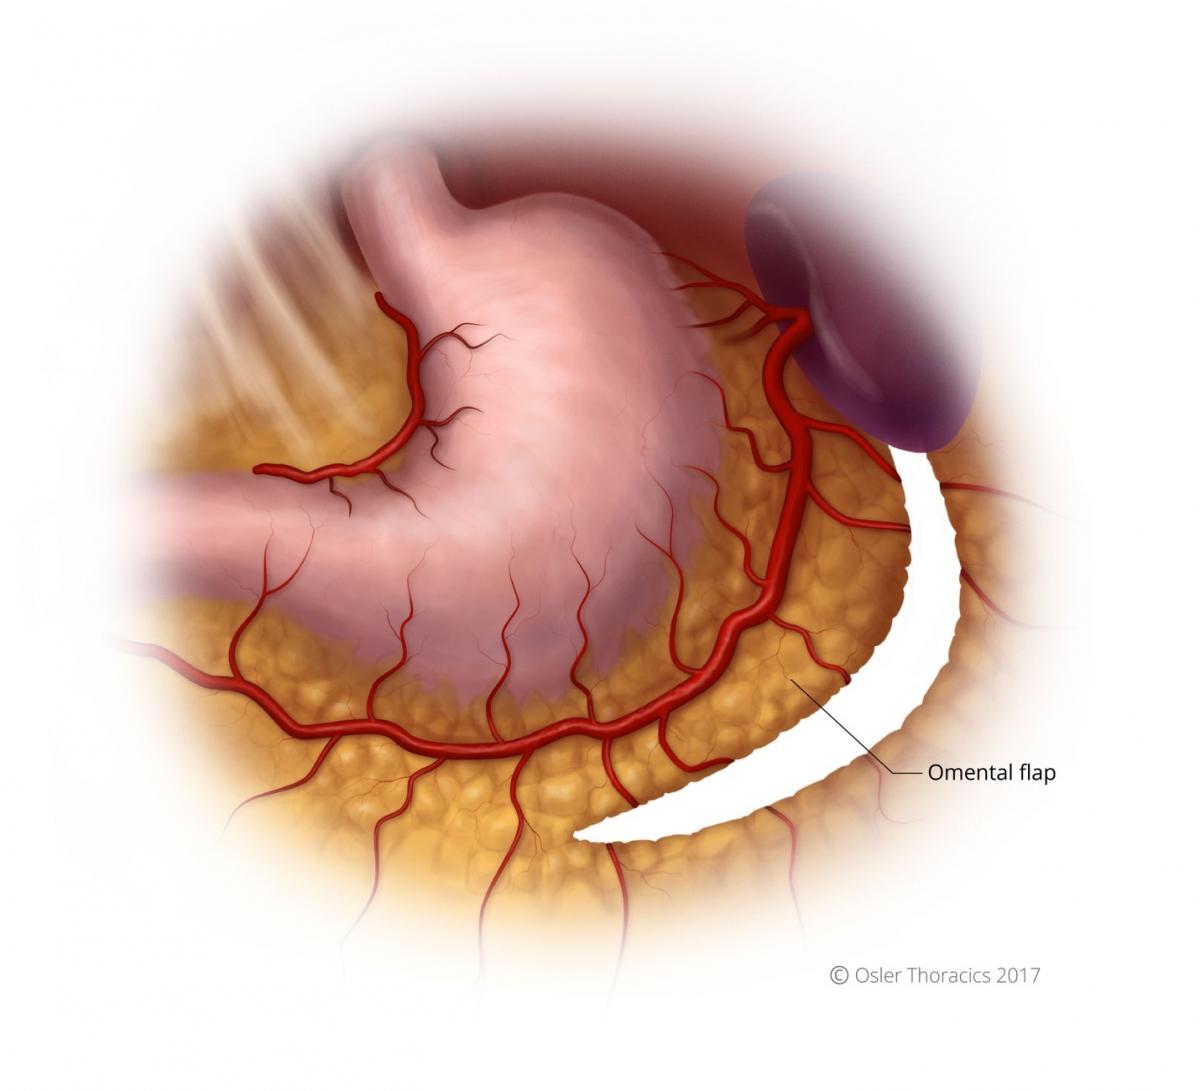
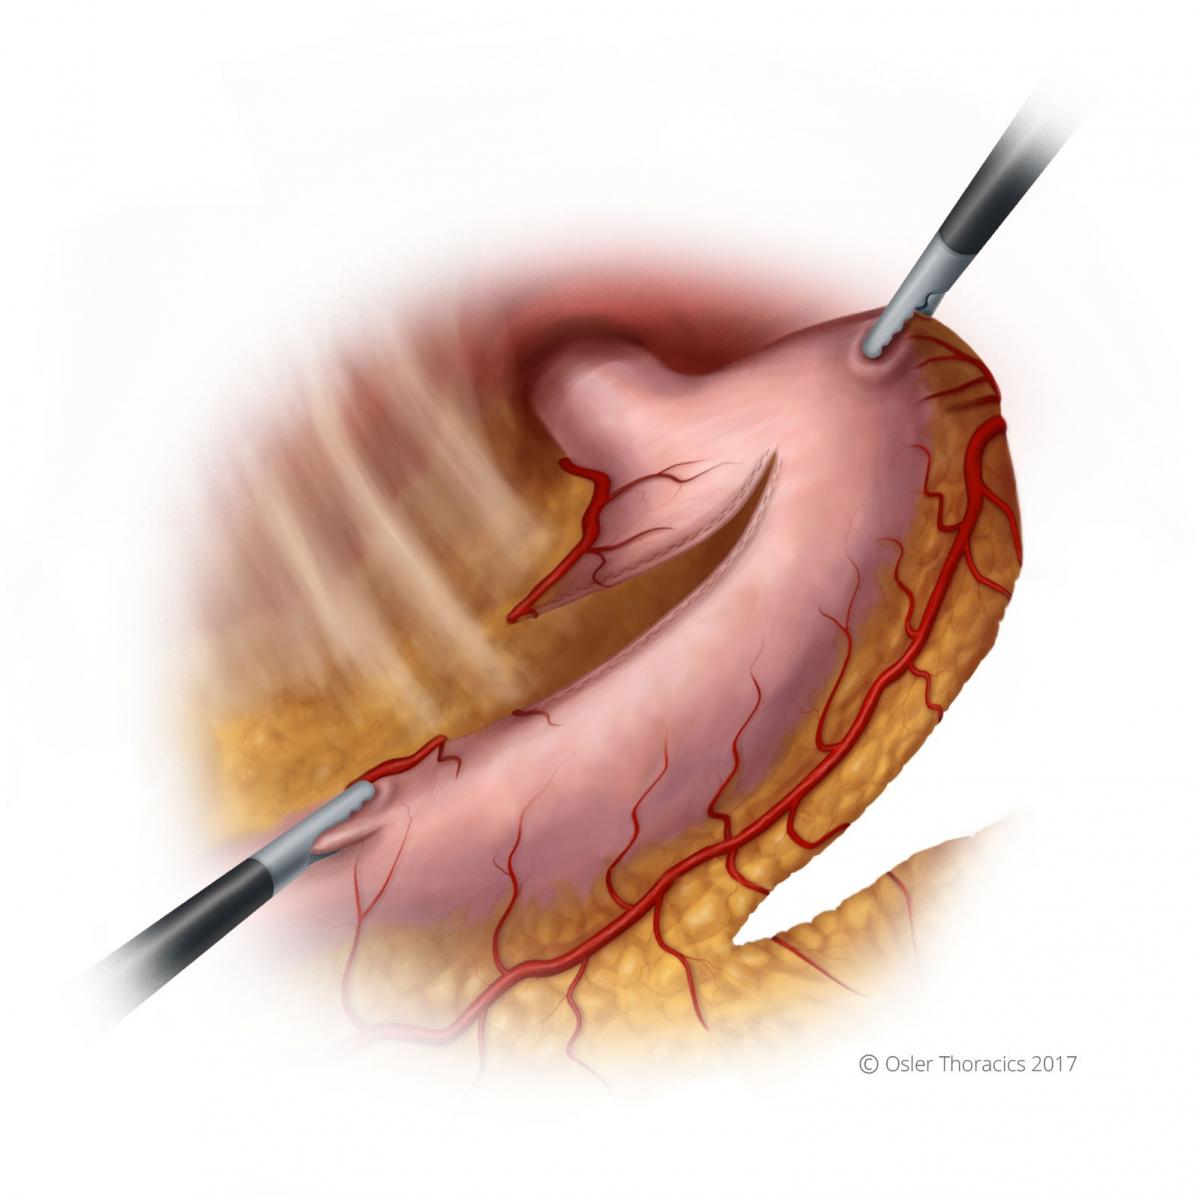
Pearl: Creation of the Omental Flap
The omental flap extends from the halfway point of the gastrocolic omentum to the short gastrics. It allows the surgeon to cover the conduit staple line and the anastomosis. Obviously, it is critical to avoid the colon wall during this dissection.
The Left Gastric Artery
Pearl: The Left Gastric Artery Post
- Prior to dissecting the left gastric artery (LGA), it is important to clear the right crus off the esophagus. This will allow one to encircle the artery more easily.
- Once this is done, use the left hand to lift the lesser curve of the stomach anteriorly, 2 - 3 cm distal to the gastroesophageal junction. This always demonstrates the contour of the LGA. The actual vessels may not be visible. However, the peritoneum, nodes, and fatty tissue around the artery will be appreciable.
- Once the LGA lymphovascular bundle has been posted, the author scores the peritoneum at the base and sweeps all the tissue anteriorly.
- This will create a nice tunnel for the vascular stapler, along the base of the vessel, below the lymph nodes, and underneath the esophagus.
- This avoids individual dissection of the nodes and allows for a nice en-block resection.


Step 3: The Conduit
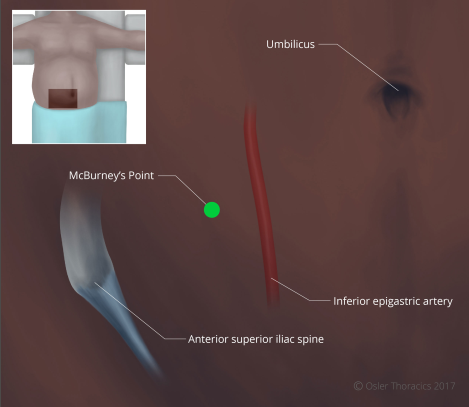
- Pearl: The RLQ port. The RLQ is needed for the feeding tube. However, it is of critical importance for the creation of the gastric conduit because of the downward traction that it provides. The port is placed at McBurney’s point, making sure to avoid the inferior epigastric artery.
- Pearl: Consider using a green (Ethicon-Thick Tissue) staple load for the first staple firing along the lesser curve. This may prevent dehiscence in a typically thick area of the stomach.
- Run the staple line parallel to the lesser curvature, maintaining a conduit between 3 - 4 cm in maximal diameter.

Pearl: The Conduit Stretch
After the second gastric firing for the conduit, it is common for the stomach to start folding in on itself and for the stapling angles to be challenging. Creating a nice straight staple line is important for its integrity and length.
- The assistant is handed the apex of the stomach and pulls toward the left upper quadrant.
- The scrub nurse or second assistant gently grasps the staple line and pulls toward the RLQ (using the RLQ port).
- As one staples, they should reposition the stomach to ensure the stomach is not folding within the stapler.
Step 4: The Feeding Tube
The author always places a feeding tube. Feedings are slowly begun 24 hours after surgery. The author uses the percutaneous Barone feeding jejunostomy set and the Endo-Stitch to place the feeding tube 25 cm distal to the ligament of Treitz.
- Pearl: Feeding tube saline push. It can be occasionally challenging to thread the feeding tube distally. Once the feeding tube in inserted into the lumen, it is only advanced 4 - 5 cm. The guidewire and inner cannula are then removed. A 60 cc syringe filled with saline is attached to the feeding tube. The assistant pushes the saline through the feeding tube as they advance it. This creates a stream of saline that helps the tip of the feeding tube travel as distally as possible.

Pearl: Perform Extensive Mediastinal Esophageal Dissection Prior to Turning the Patient
Prior to turning the patient and tacking the conduit, the author strongly recommends extensive mediastinal dissection. The exposure through the hiatus is usually excellent, and the distal esophagus can often be mobilized safely to the inferior pulmonary vein.
Pearl: Two-Point Tacking, Recreating Normal Anatomy
In order to prevent a twisting of the conduit as it is pulled up into the right hemithorax, the author sutures the conduit to the specimen at two spots, 1 cm apart.
Pearl: Posterior Crural Stitch
The authors have seen two of their long-term survivors return complaining of symptoms suggestive of conduit compression. Imaging revealed transverse colon herniation through a gaping hiatus. Although this is easy to fix laparoscopically, in patients with a large hiatus, the authors routinely place a posterior crural stitch. It should be snug enough to prevent herniation, but loose enough to allow for smooth delivery of the conduit into the chest. After the stich is complete, tuck the conduit into the mediastinum.

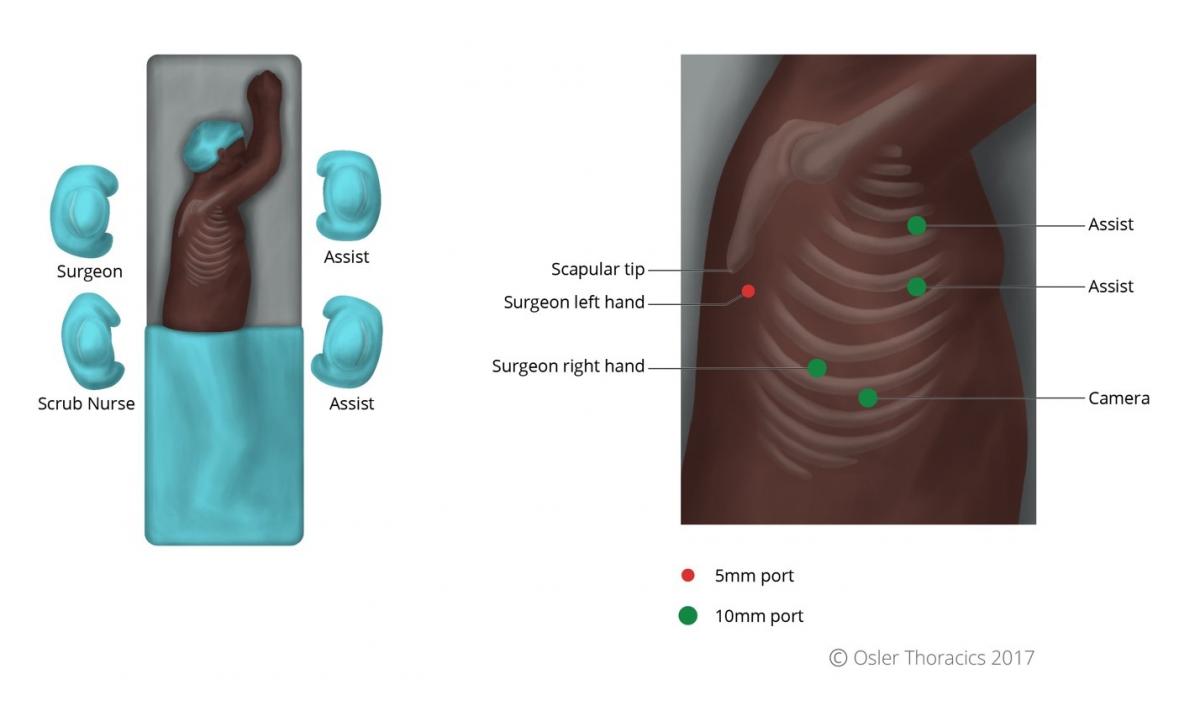
VATS Portion of Procedure
Port Placement and Exposure With Two Assistants
The VATS part of an MIE is best completed with the help of a second assistant who has two ports. This allows the camera operator to focus on maintaining excellent exposure and another assistant to provide retraction. Like an open Ivor-Lewis esophagectomy, the patient is turned to the left lateral decubitus position. The two assistants stand at the left side of the bed, while the surgeon and scrub nurse are on the right.
The author uses five ports:
- A 10 mm camera port in the ninth intercostal space along the anterior axillary line. Placing it too posteriorly will result in it being too “in-line” with the surgeon’s right working port, while placing it too anteriorly will result in a mirror image.
- A 10 mm right working port is usually placed in the eighth intercostal space, approximately 5 - 7 cm posterior to the cameral port. This port serves as the surgeon’s right hand.
- The authors place two 10 mm assistant ports anteriorly in the fourth and sixth intercostal spaces, for a fan retractor and a suction device. As the initial dissection is in a closed system, a hand-controlled suction device is recommended to prevent negative pressure in the pleural space.
- A 5 mm port is placed posterior and inferior to the scapular tip, serving as the surgeon’s left hand.
Pearl: The Diaphragm Stitch
A diaphragm stitch can vastly improve the exposure in the right hemidiaphragm. The surgeon introduces an uncut Endo Stitch™ into the right working port and places it into the tendinous part of the diaphragm. Using a Carter-Thomason suture grasper placed through the side of the camera port, both ends are pulled through the camera port incision; the camera and port are not removed. The retraction is maintained by placing a snap on the suture when flush to the chest wall.
Step 5: Esophageal Mobilization
- The inferior pulmonary ligament is incised to the inferior pulmonary vein.
- The mediastinal pleura is divided along the hemiazygos vein. Once the azygos is reached, it is encircled and stapled. The esophagus is pulled laterally by the assistant’s right hand.
- Dissection is carried out along the pericardium, with the surgeon pulling the esophagus posteriorly.
- The pericardial dissection is where the airway must be carefully preserved. The dissection occurs under the airway, along the bronchus intermedius and carina. The subcarinal nodes can be mobilized and resected.

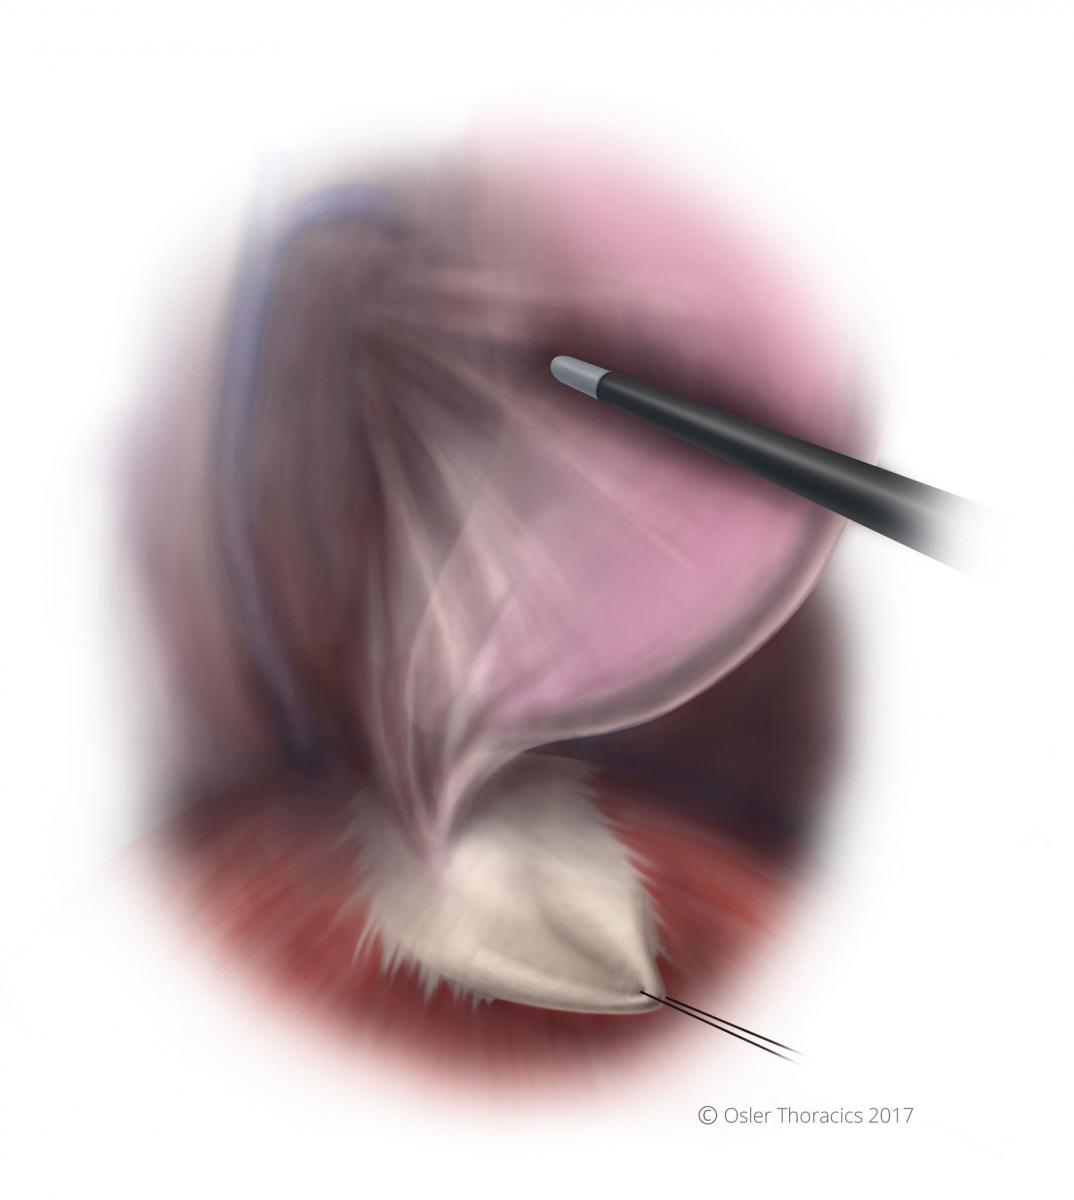
Pearl: Avoid Energy Near the Airway
The harmonic scalpel can easily result in injury to the membranous portion of the airway, either from direct injury or from thermal spread. The subcarinal space can be very vascular, so sometimes it is hard to avoid its use. The author uses blunt dissection in this area, however precise application of energy is used when a feeding vessel is identified. The nodes are cleared, demonstrating the skeletonized subcarinal space.
Pearl: Liberal Use of Clips to Avoid Bleeding and Lymphatic Leaks
The author avoids the thoracic duct, but ligates it if there is concern about its integrity. Although the harmonic scalpel can control the aortoesophageal vessels well, the accompanying lymphatics can result in small but frustrating chyle leaks. This can be avoided by placing clips, as the author does not feel small lymphatic vessels can be adequately sealed with energy.
Step 6: Early Pull-Up of the Gastric Conduit
After the lower part of the esophagus is completely mobilized approximately 5 cm above the hiatus, the author routinely pulls up the conduit. This results in significantly improved mobility and exposure, making the rest of the dissection very easy. The author does not pull up too much conduit immediately, however, to prevent crowding. The mobilization of the esophagus is carried up to the level of the azygos vein.
Step 7: Transection of the Esophagus and Preparation for the Anastomosis
Depending on the location of the cancer, the assistant staples the esophagus from the anterior port. The specimen is removed by extending the surgeon’s right hand port. Usually, this port is converted to a 4 cm incision and a wound protector is placed.
Step 8: The OrVil™: Eliminating the Need to Go the Neck
Early in his experience, the author simply used scissors to cut the esophagus. He would place two purse string sutures around the esophagus and cinch it around the EEA™ anvil. This approach is time consuming, technically challenging, and limits the proximal margin because of esophageal retraction. Although it is still possible, it is ergonomically challenging to create the anastomosis near the thoracic inlet. With the OrVil™ stapling device, the anastomosis can easily be placed high in the chest. In fact, the anastomosis is frequently at the same location as with a McKeown esophagectomy. The OrVil™ tube is placed in the mouth and threaded into the esophagus, where it is pulled through a small esophagotomy.
Pearl: Tricks With the OrVil™
- Disinfect the mouth with an antiseptic swab.
- After the assistant places the orogastric part of the OrVil™ into the mouth, the surgeon grabs the posterior side of the esophageal staple line, while the camera operator grasps the anterior side. A large bite is taken to obliterate the lumen and guide the tube into the center of the staple line.
- The harmonic scalpel is used to make a very small esophagotomy directly at the center of the staple line. Using gentle pressure, the assistant pushes the tube through the hole.
- It is important for the assistant to guide the anvil into the mouth. The concave part of the anvil should face the hard palate. Avoid getting caught on the double-lumen tube, temperature probe, etc.
- The suture is cut at one place and the nasogastric tube is removed. Gloves are changed.
Pearl: The Square Purse String
A square purse string is placed around the anvil. This ensures that all edges are tightly secured around the anvil. After doing this, the author noticed EEA™ donuts that were more complete and the leak rate plummeted.


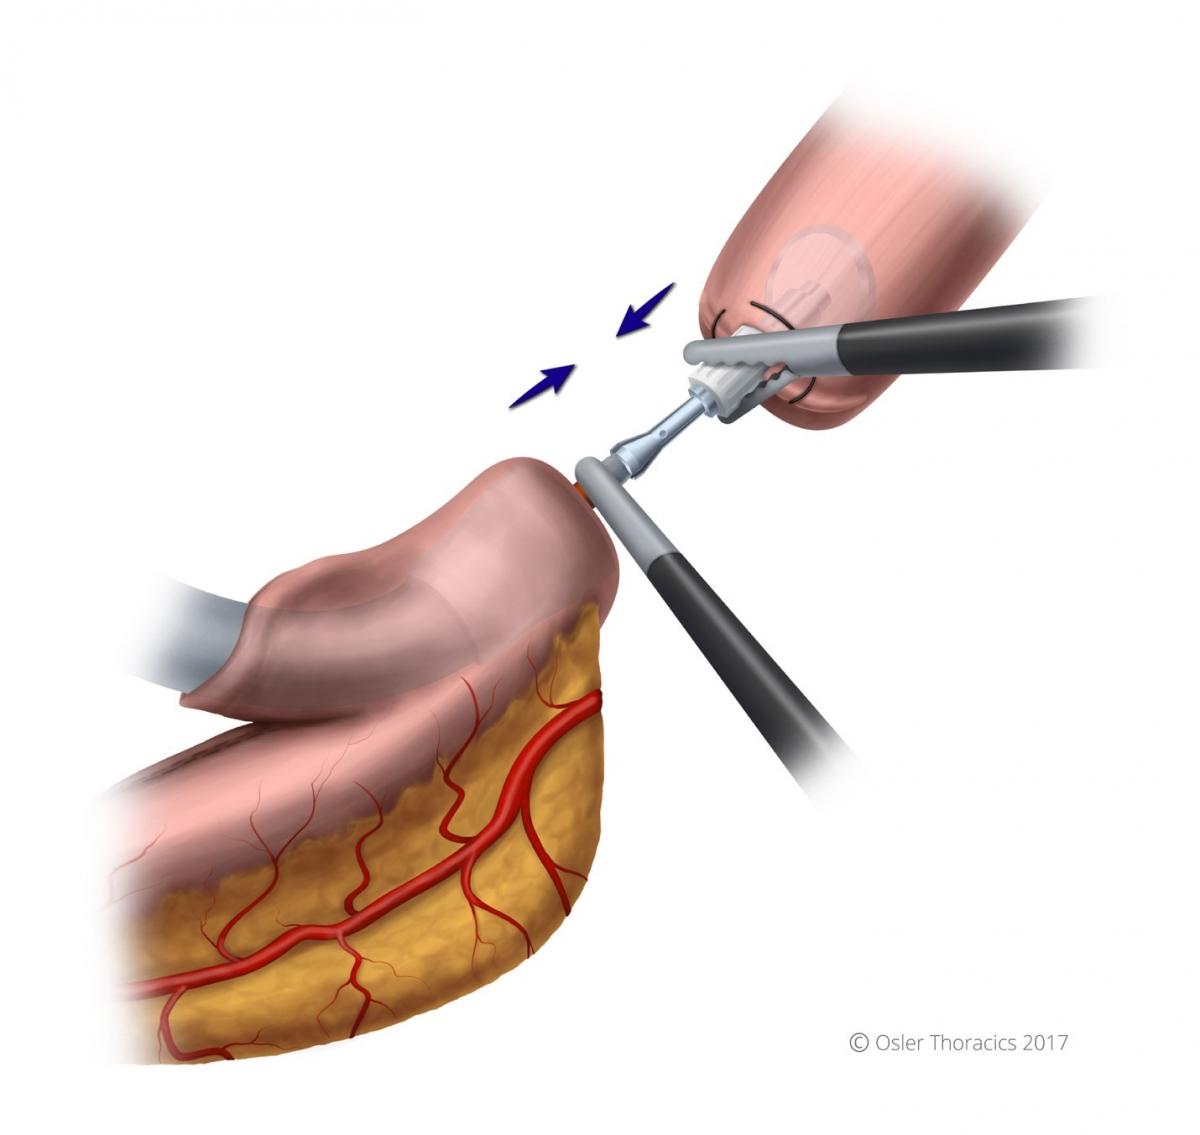
The Foot Going Into the Sock
A gastrotomy is made at the tip of the gastric tube. The stapler is passed into the gastric conduit using two graspers. The stapler passes into the conduit like a foot goes into a sock, with the “toes” being the site of the anastomosis. This will allow you to later amputate the gastric tip, which can be dusky. Once in the proper positon, the needle is deployed completely, piercing the greater curvature of the stomach. The surgeon holds the “sock” in position with their left hand while the assistant grabs the anvil with a firm instrument.

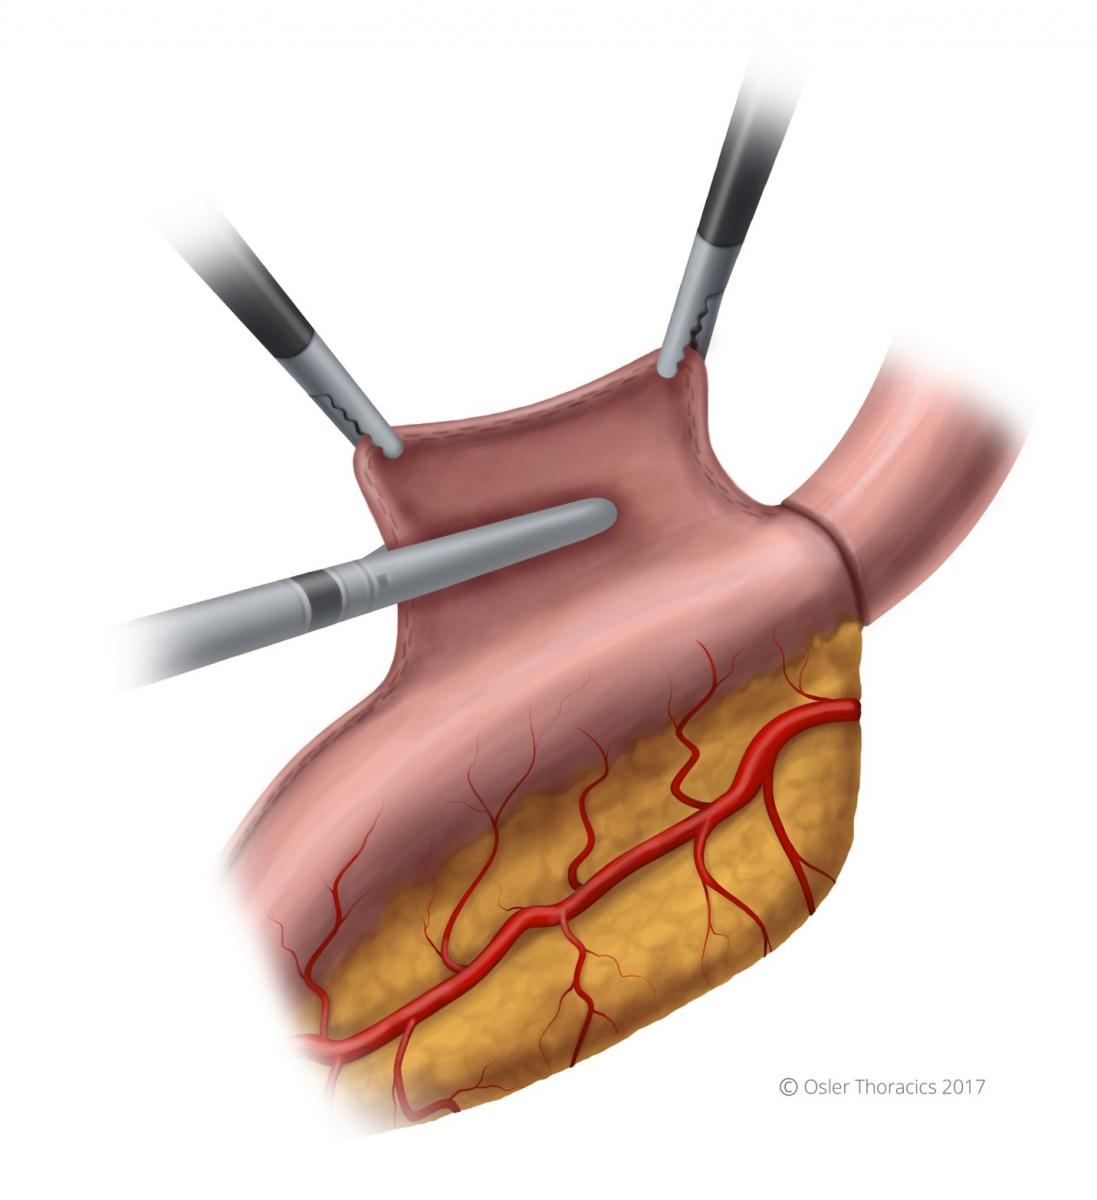
Pearl: Mating the Anvil With the Stapler
Initially, the author struggled with this step, as two-dimensional optics prevented a seamless mating. There are a few pearls to consider when mating the anvil with the stapler:
- Use the stapler to pull up the rest of the conduit to avoid redundant stomach.
- The surgeon should maintain a left-hand-pull on the conduit as it lies in the stapler, in order to prevent the needle from coming out.
- Grab the anvil by the white plastic base. This keeps the metal port open.
- Once inserted, it is clicked in place by the surgeon pushing the stapler and the assist pulling the anvil. The anvil is “wiggled” into the stapler needle.
- Be aware that when pressure is applied with resistance, the needle can retract, so the camera operator is asked to hold the needle dial taut during the mating process.
- Once the device ends are mated, ensure that the orange part of the needle is within the anvil.
- While closing the stapler, be aware that when the anvil staple line straightens, there is a feeling of release that may cause worry. This is normal, and undoing anything to inspect is unnecessary.
- Prior to firing, make sure there are no other structures in the staple line.
Step 9: Closure of the Gastrotomy
After a nasogastric tube is placed, the gastrotomy is closed using the Echelon stapler. The specimen is marked and sent to determine the final gastric margin.
Step 10: Cover Anastomosis With Omental Flap