
ALERT!
This site is not optimized for Internet Explorer 8 (or older).
Please upgrade to a newer version of Internet Explorer or use an alternate browser such as Chrome or Firefox.
Minimally Invasive Endoscopic Repair of Pectus Excavatum
Patient Selection
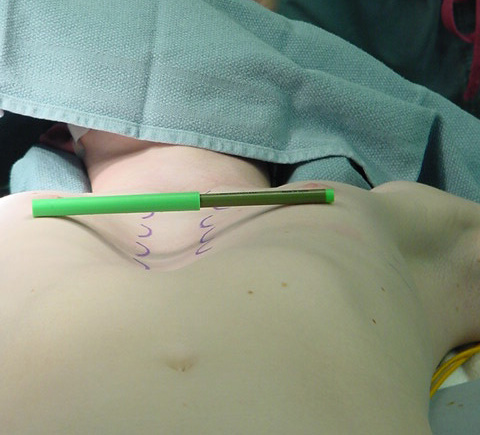 |
| Figure 1. The typical appearance of a pectus excavatum deformity. |
Pectus excavatum, a relatively commonly occurring congenital chest wall deformity in children, is a depression of the sternum that commonly starts at the angle of Louis, and is deepest at the xiphisternal junction [1] (Figure 1). When severe, pectus excavatum deformity can cause cardiopulmonary insufficiency from the compression of the right atrium and right ventricle and diminished vital capacity of the lungs [1]. A variety of techniques are available to repair pectus excavatum deformity. The classic open surgical repair of pectus excavatum (the Ravitch repair) entails subperichondrial resection of the deformed cartilages and a sternal osteotomy [2], often combined with retrosternal support with a metal bar [3, 4, 5]. Three other pectus excavatum repair techniques include sternal turnover, unilateral costoplasty, and silicone implant reconstruction.
In 1987, Dr. Donald Nuss developed a minimally invasive technique for treatment of pectus excavatum using a convex steel bar placed beneath the pectus deformity and turned to correct the defect [6-10]. Excellent long-term results have been achieved with this technique [6, 7, 9,10]; however, questions regarding the safety of this technique have been raised [3, 7]. In an effort to address these safety concerns, at All Children's Hospital of Saint Petersburg, Florida, U.S.A., we have modified Dr. Nuss' technique in order to increase the surgeon's control during the creation of the retrosternal tunnel and the passage of the steel retrosternal bar. The operative technique described below is our modification of Dr. Nuss' technique using extrapleural endoscopic visualization to permit minimally invasive endoscopic pectus excavatum repair. This technique is suitable for any patient with primary pectus excavatum deformity and evidence of associated physiological or psychological compromise. This technique is not suitable for recurrent pectus excavatum deformity after prior attempted repair. Although this technique may be applied to patients of any age, we prefer to wait until the patient is at least 4 years old.
Numerous manuscripts in the literature exist that document the physiologic impact of pectus excavatum deformity with its associated cardiopulmonary compromise. Exercise performance has been shown to improve after pectus repair supporting the concept that repair of pectus excavatum will improve both the restricted cardiac stroke volume and the increased work of breathing associated with pectus excavatum. Furthermore, pectus excavatum clearly has an associated psychological impact–the unwillingness to expose one's chest can be psychologically devastating in childhood and the teenage years. The benefits of repair are clearly not cosmetic alone. Even without the clearly documented but somewhat controversial physiologic benefits, the psychological impact alone justifies repair. Because of the remarkable psychological impact and the improvement in self esteem we have observed after pectus repair, we do not spend time, effort, or money on complex physiologic testing. The mere presence of pectus excavatum deformity with evidence of associated physiological or psychological compromise represents an indication for repair.
Operative Steps
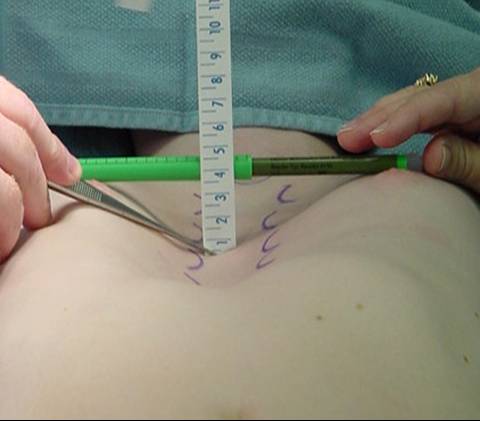 |
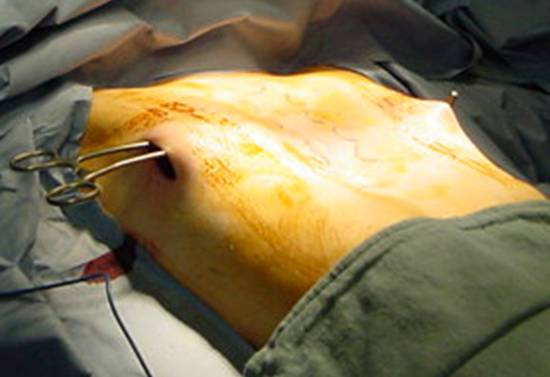
| Figure 2. A sterile marking pen marks the skin at the interspaces of maximal pectus depth on each side of the sternum. In this example, the pectus depth measures 4.5 cm. |
Under general anesthesia, an epidural catheter is placed to aid in perioperative pain control. An endotracheal tube, radial arterial line, and Foley catheter are placed. A sterile marking pen marks the skin at the interspaces of maximal pectus depth on each side of the sternum. The defect usually involves the lower one half to two thirds of the sternum. The deepest point is typically just superior to the junction of the sternal body and the xiphoid process.
The preoperative anatomy is documented with photography in the AP plane (Figure 2) and lateral plane. Eventually, a retrosternal stainless steel bar will be placed from midaxillary line to midaxillary line at the level of maximal pectus depth. The length from midaxillary line to midaxillary line is measured in order to select the proper bar size.
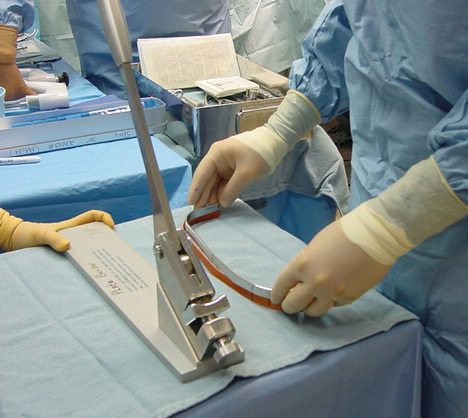
A malleable template of the previously measured length is selected (Figure 3) and molded to the ideal shape. The template is individually shaped for each patient to match the ideal chest wall shape by curving the template to match the curvature of the patient's chest. This shaping of the template includes very slight over-correction centrally. This template then is used to aid in shaping the stainless steel bar. The bar is bent and molded to match the template (Figure 4). Again, this shaping of the bar includes very slight central over-correction. Once shaped, the stainless steel bar is soaked in antibiotic irrigation until the patient is ready for retrosternal stainless steel bar insertion.
 |
 |
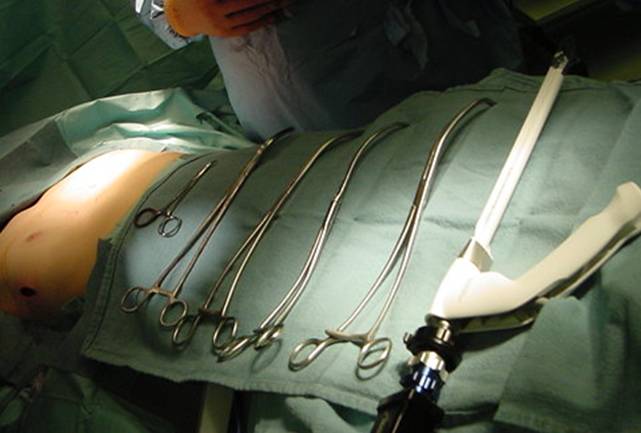 |
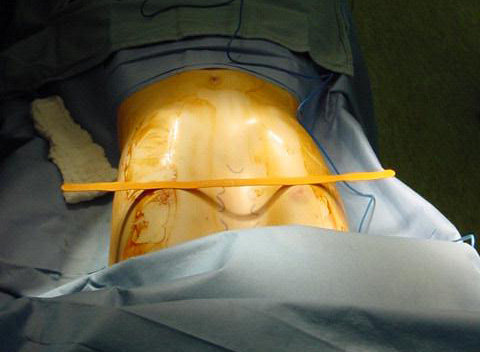
| Figure 3. A template is individually measured and shaped for each patient to match the ideal chest wall shape by curving the template to match the curvature of the patient's chest. | Figure 4. The template is used to aid in shaping the stainless steel bar. The bar is bent and molded to match the template | Figure 5. This figure demonstrates the endoscopic tunneling device and the clamps used for tunneling. Clamps ranging from small to large will be utilized to create the retrosternal tunnel. This tunnel will be deep to the pectoralis musculature but superficial to the ribs and intercostal musculature. Successively larger clamps will mature the tunnel. |
Two 2 centimeter skin incisions are made in the midaxillary line bilaterally, at the level of maximum pectus depth where sternal bone is present. These incisions are matured to the chest wall with a protected Bovie cautery. A sweeping motion creates a pocket posterior to the incision for the tip of the bar, which will lie deep to chest wall musculature but superficial to the ribs and intercostal musculature. Clamps ranging from small to large will be utilized to create a retrosternal tunnel.
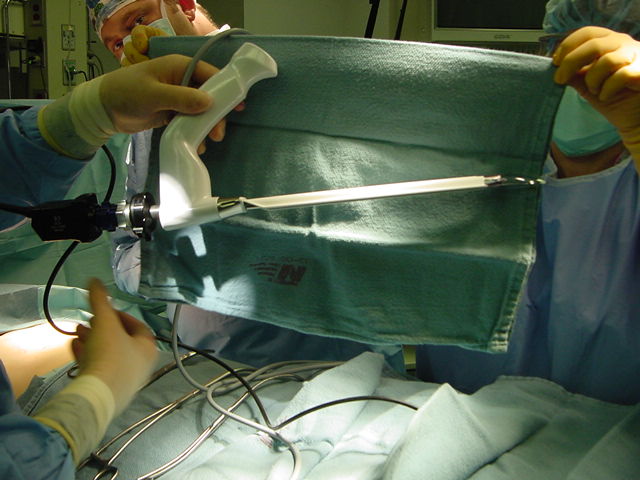 |
| Figure 6. The endoscopic tunneler is the same instrument used in our adult cardiac program for endoscopic saphenous vein procurement. |
We utilize the endoscopic saphenous vein harvesting equipment from our adult cardiac program to create the tunnels endoscopically, under visual guidance (Figure 6). We have found similarity between the tunnel necessary for endoscopic saphenous vein harvesting and the tunnels for minimally invasive pectus repair and we feel that the improved visualization afforded by this technique might decrease the potential for cardiac or mammary artery injury during minimally invasive pectus repair.
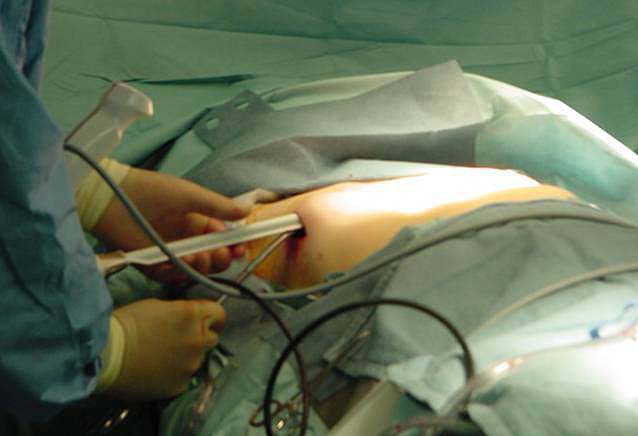
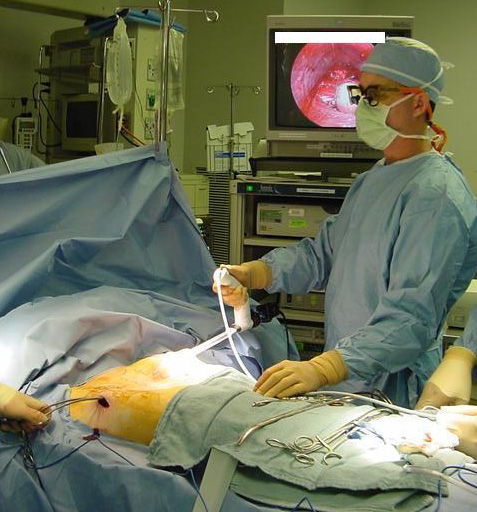
Once the tunnel reaches the sternum, the endoscopic tunneling device is utilized to visualize the clamp entering the interspace of maximal pectus depth and passing retrosternal (Figure 7). At the level of the sternum, these tunnels go retrosternal and communicate with each other. Ideally, even after entering the interspace, the tunnel stays extrapleural. The endoscopic view of the tunnel allows visualization of the safe passage of the clamp under the sternum and anterior to the pericardium. The mediastinum and pericardium can be seen pulsating posterior to the clamp. Two monitoring screens are utilized in order to allow excellent visualization by both the surgeon and assistant (Figure 8). Eventually, the larger curved clamp is easily passed under the sternum (Figure 9). This clamp is thus passed through one midaxillary skin incision and out the other midaxillary skin incision.
 |
 |
 |
| Figure 7. The endoscopic tunneling device is utilized to visualize the clamp entering the interspace of maximal pectus depth and passing retrosternally. The endoscopic view of the tunnel allows visualization of the safe passage of the clamp under the sternum and anterior to the pericardium. | Figure 8. Two monitoring screens are utilized in order to allow excellent visualization by both the surgeon and assistant. | Figure 9. The larger curved clamp is passed in one midaxillary skin incision, under the sternum, and out the other midaxillary skin incision. |
The clamp is then opened and used to grasp an umbilical tape and pull the tape through the tunnel (Figure 10). This umbilical tape is tied to two more umbilical tapes so that one tape can be used to pull a flat mediastinal tube through the tunnel and the second umbilical tape can act as a back-up. One umbilical tape is tied to a flat mediastinal tube. Then, this flat mediastinal tube is lubricated (Figure 11) and pulled through the tunnel and used to gently dilate the tunnel. The tunnel pathway is then endoscopically inspected to confirm hemostasis and satisfactory position of the flat mediastinal tube (Figure 12 ).
 |
 |
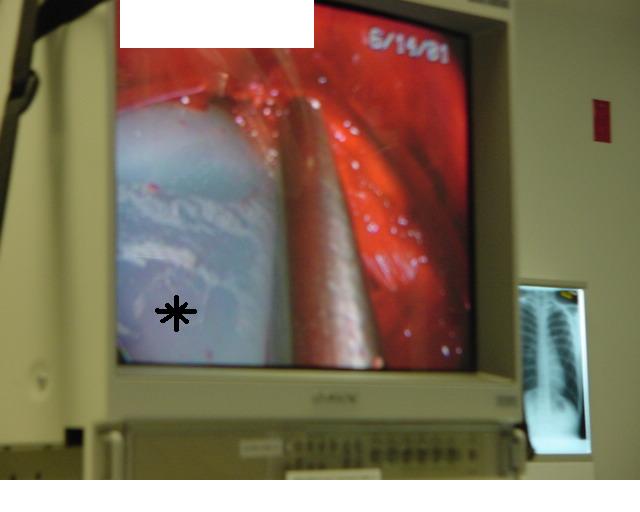 |
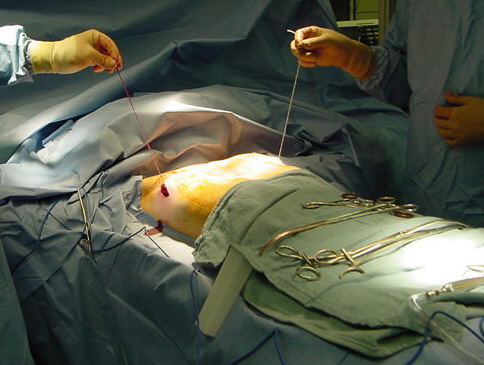
| Figure 10. An umbilical tape is pulled through the tunnel and then tied to two more umbilical tapes so that one tape can be used to pull a flat mediastinal tube through the tunnel and the second umbilical tape can act as a back-up. | Figure 11. One umbilical tape is tied to a flat mediastinal tube that is lubricated and pulled through the tunnel and used to gently dilate the tunnel. | Figure 12. The tunnel pathway is endoscopically inspected to confirm hemostasis and satisfactory position of the flat mediastinal tube. An * marks the flat mediastinal tube. A metal sucker is pointing to the lateral wall of the sternum. |
The mediastinal tube is again irrigated and lubricated internally and externally with antibiotic solution. The previously shaped steel bar is then passed through the retrosternal space within the flat silastic mediastinal drain, thereby protecting surrounding mediastinal structures. The flat mediastinal tube provides some protection as the bar passes retrosternal through the tunnel. Thus, the curved steel bar is passed through one tunnel, under the sternum, and out the other tunnel. The steel bar is inserted with the convexity facing posteriorly (Figure 13). Once the bar is within the tunnel and in a retrosternal position, the flat mediastinal tube and back-up umbilical tape are removed. The bar edges are flared inward bilaterally. The bar is then rotated so that the convexity faces anteriorly, thereby correcting the deformity. Very slight over-correction by design is evident.
The bilateral ends of the bar are now tucked into the previously created pockets under a flap of muscle. Endoscopic inspection of the tunnel allows visualization of the tunnel, confirms adequate tunnel hemostasis, and documents excellent retrosternal bar position. The bar can be seen just posterior to the sternum (Figure 14). For larger patients with larger defects, two bars may be used.
 |
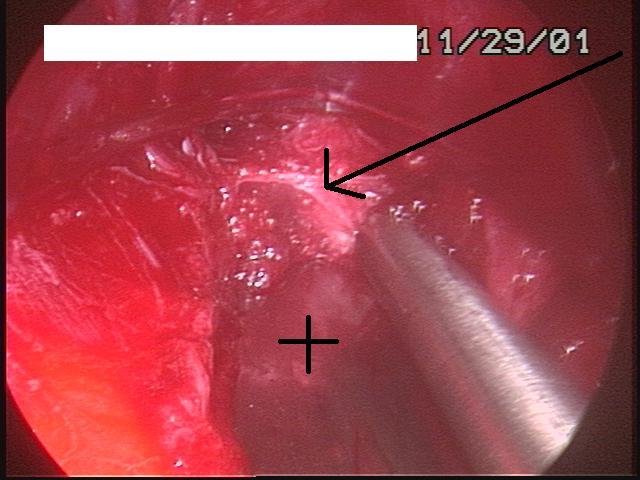 |
| Figure 13. The curved steel bar is passed through one tunnel, under the sternum, and out the other tunnel. The bar is now within the tunnel and in a retrosternal position. | Figure 14. Endoscopic inspection of the tunnel allows visualization of the tunnel, confirms adequate tunnel hemostasis, and documents retrosternal bar position. The bar can be seen just posterior to the sternum. A + marks the bar and an arrow shows where a metal sucker is touching the lateral wall of the sternum. |
To prevent bar migration, the bar is then secured in position bilaterally to the chest wall fascia with 3 heavy non-absorbable monofilament sutures [#1 Prolene]. One posterior non-absorbable suture is passed through a hole in the bar. Two additional anterior non-absorbable sutures are passed around the bar. Using this technique, we have not seen the reported complication of bar migration or “wandering” of the Nuss bar. Occasionally, a small steel grooved plate is used to stabilize the bar(s) (Stabilizing plates are available from Walter Lorenz Surgical, Jacksonville, Florida, U.S.A.).
The two incisions, each less than one inch long, are then closed with absorbable monofilament sutures (Figure 15). A chest X-ray is performed in the operating theater to document satisfactory bar position and evaluate for pneumothorax. The post-repair anatomy is documented with photography in the AP plane (Figure 16) and lateral plane. Patients are extubated in the operating theater.
 |
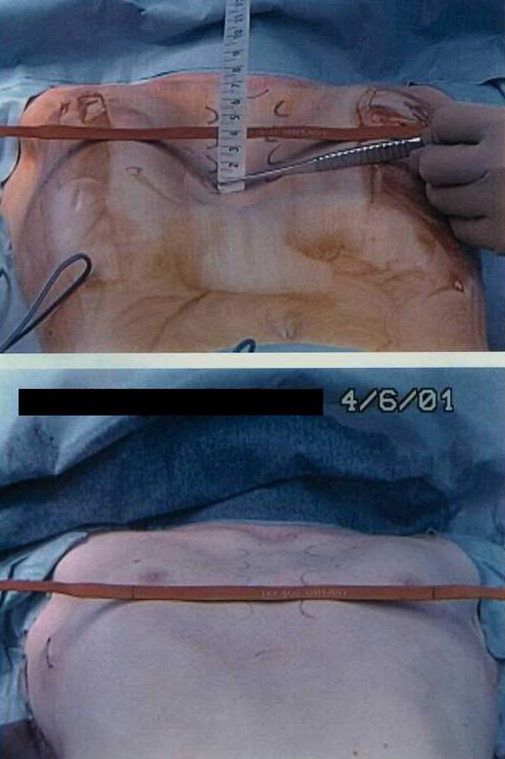 |
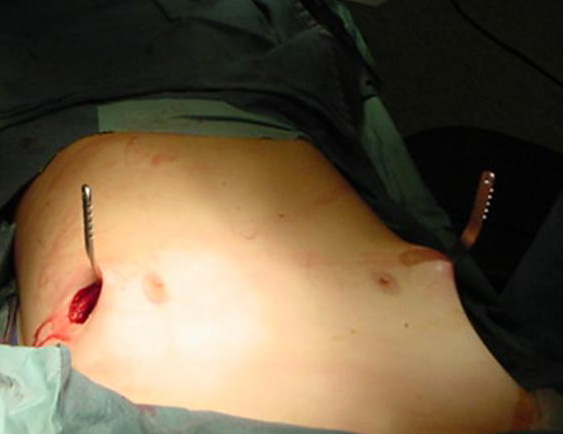
| Figure 15. The bilateral ends of the bar are now tucked into the previously created pockets under a flap of muscle. The bar is then secured in position bilaterally with 3 heavy non-absorbable monofilament sutures. | Figure 16. The preoperative and postoperative appearance of the chest wall. |
Preference Card
- Pectus clamps (Walter Lorenz Surgical, Jacksonville, Florida, U.S.A.)
- Video endoscope
- Endoscopic tunneling device (endoscopic saphenous vein harvesting equipment from our adult cardiac program)
- Steel pectus bars of various sizes (Walter Lorenz Surgical, Jacksonville, Florida, U.S.A.) (If the patient is allergic to steel, a Titanium bar may be custom made.)
- Flat silastic mediastinal tube large enough to hold bar
- #1 Prolene to secure bar
Tips & Pitfalls
- Wait until the patient is 4 years of age before performing the correction. Once older than 4 years, the younger the patient is, the easier the repair, because in younger patients the chest wall is more malleable and the length between the skin incision and the sternum is less.
- Use arterial line monitoring during the procedure to assess any hemodynamic compromise created by the dissection. During the creation of the retrosternal tunnel, monitor the arterial line tracing as well as the EKG for any changes.
- Perform a chest radiograph prior to leaving the operating theater. A small to moderate pneumothorax may be managed conservatively with supplemental oxygen therapy and without chest tube placement.
- Keep the epidural catheter in place for 2 to 3 days to aid in perioperative pain control.
- Bar removal is performed when permanent chest wall remolding has occurred. We currently recommend bar removal 2 years after insertion in patients under age 10 at the time of bar insertion. For patients between age 10 and 13 at the time of bar insertion, we recommend bar removal 3 years after insertion. For patients over age 13 at the time of bar insertion, we recommend bar removal 4 years after insertion.
- Bar removal is performed as an outpatient procedure. Both incisions are opened and the bar is exteriorized bilaterally. One end of the bar is then straightened and the bar is withdrawn from the contralateral side.
Results
Our initial 3.5 year experience with minimally invasive endoscopic pectus excavatum repair utilizing this modification of the "Nuss" technique involved 31 patients (age: range = 4.4 to 31.0 years, median = 15.0 yr, mean = 14.5 yr; weight: range = 18 to 120 kg, median = 52 kg, mean = 56 kg) [10]. Median hospital length of stay was 4 days (range 3 - 10 days, mean = 4.6 days). Pneumothorax occurred in 5 patients with tube thoracostomy placement in 3. One patient developed delayed bilateral pleural effusions requiring drainage. Two patients developed evidence of sterile seroma formation at the skin incision several months after minimally invasive repair of pectus excavatum. In one patient, this seroma formation was related to local trauma; the seroma developed spontaneously in the second patient. In both patients, the seromas resolved within 10 days with non-interventional conservative medical treatment (warm compresses and non-steroidal anti-inflammatory drugs). Neither patient required drainage of the seromas. No other complications occurred.
This technique of minimally invasive endoscopic pectus repair is safe and effective and currently our procedure of choice for primary pectus excavatum in all ages. Endoscopic visualization facilitates the safe creation of the retrosternal tunnel. All patients and families have been pleased with the short-term and mid-term results. The results reported by Dr. Nuss support the expectation of good long-term results.
References
- Backer CL, Mavroudis C: The Society of Thoracic Surgeons Congenital Heart Surgery Nomenclature and Database Project: vascular rings, tracheal stenosis, and pectus excavatum. Ann Thorac Surg 2000 Apr;69(4 Suppl):S308-18.
- Ravitch M.M. The operative treatment of pectus excavatum. Ann Surg 1949;129:429-444.
- Willekes CL, Backer CL, Mavroudis C. A 26-year review of pectus deformity repairs, including simultaneous intracardiac repair. Ann Thorac Surg 1999;67:511-8.
- Haller JA, Scherer LR, Turner CS, Colombani PM. Evolving management of pectus excavatum based on a single institutional experience of 664 patients. Ann Surg 1989;209:578-583.
- Shamberger RC, Welch KJ. Surgical repair of pectus excavatum. J Pediatr Surg 1988;23:615-622.
- Nuss D, Kelly RE Jr, Croitoru DP, Katz ME. A 10-year review of a minimally invasive technique for the correction of pectus excavatum. J Pediatr Surg 1998;33:545-52.
- Hebra A, Swoveland B, Egbert M, Tagge EP, Georgeson K, Othersen HB Jr, Nuss D. Outcome analysis of minimally invasive repair of pectus excavatum: review of 251 cases. J Pediatr Surg 2000;35:252-7.
- Engum S, Rescorla F, West K, Rouse T, Scherer LR, Grosfeld J. Is the grass greener? Early results of the Nuss procedure. J Pediatr Surg 2000;35:246-51.
- Jacobs JP, Quintessenza JA, Botero LM, van Gelder HM. Minimally invasive endoscopic pectus excavatum repair. Presented at The Forty-seventh Annual Meeting of The Southern Thoracic Surgical Association, Marco Island, Florida, U.S.A., Wednesday, November 8, 2000.
- Jacobs JP, Quintessenza JA, Morell VO, Botero LM, van Gelder HM, Tchervenkov CI. Minimally Invasive Endoscopic Repair of Pectus Excavatum. Eur J Cardiothorac Surg 2002;21:869-873.


