
ALERT!
This site is not optimized for Internet Explorer 8 (or older).
Please upgrade to a newer version of Internet Explorer or use an alternate browser such as Chrome or Firefox.
Tips and Tricks for the Updated Y-Incision Aortic Annular Enlargement
Hassler K, Chen SA, Titsworth M, Yang B. Tips and Tricks for the Updated Y-Incision Aortic Annular Enlargement. October 2025. doi:10.25373/ctsnet.30408184
This video submission is from the 2025 CTSNet Innovation Video Competition. Watch all entries from the competition, including the winning videos.
This video and content is presented from the perspective of the advanced aortic fellow learning and performing the Y-Incision aortic annular enlargement. Within, the authors share the tips and tricks learned along the way in mastering this widely applicable technique.
Patient Selection
All patients with a small or normal aortic annulus (17-25 mm) undergoing aortic valve replacement are considered good candidates for the Y-incision aortic annular enlargement (AAE). This technique is broadly applied so that the inner diameter of the prosthetic valve opening matched the diameter of the basal ring, which is the “aortic annulus” measured by imaging studies (echocardiogram, computed tomography angiography), to prevent iatrogenic patient prosthesis mismatch (PPM). It is well known that labelled valve sizes are not consistent with the inner diameter of the valve prosthesis. Typically, the inner diameter of the prosthetic valve cusp (effective orifice area) is 5-7 mm smaller than the valve size. Therefore, annular enlargement is required to avoid PPM. Exclusion criteria for this procedure include full-thickness severely calcified aortomitral curtain and anterior mitral annulus, as well as isolated congenital tunnel left ventricular outflow tract (LVOT) stenosis without aortic valve disease. For patients with coexisting aortic valve stenosis and LVOT or subannular stenosis, such as hypertrophic obstructive cardiomyopathy (HOCM) or subaortic membrane, the authors recommend myectomy or subannular membrane resection with Y-incision AAE.
Operative Strategy and Technique of Aortic Valve Replacement (AVR) With Y-Incision AAE
Aortic cannulation was performed at the innominate artery level, allowing enough length of aorta for patch closure at the completion of the procedure. This allowed for cross-clamp placement as distal as possible, just proximal to the take-off of the innominate artery.
A complete transverse aortotomy was made approximately 2-2.5 cm above the sinotubular junction (STJ). A 4-0 Prolene suture was used to tack the distal cut end of the ascending aorta cephalad, creating a wider operative field. The stenotic aortic valve was excised, and the annulus was debrided of calcium.
The Y-incision AAE proceeded with an incision of the left noncommissure extending from the aortotomy into the aortomitral curtain. The incision was then extended in a Y fashion into the aortomitral curtain, parallel to and below the aortic annulus, undermining the left and noncoronary annulus to their respective nadirs by cutting into the left and right fibrous trigones. It is important to note that the incision should not cut through the trigones completely, instead stopping 2-3 mm proximal to the myocardium on the left side and to the membranous septum on the noncoronary sinus side. This maneuver widely opens the aortic root. If the Y-incision is not wide enough in the fibrous trigones, the patch will be smaller, and the enlargement will be limited.
A 2 x 3 inch (5 x 7.5 cm) rectangular-shaped Dacron patch was trimmed in width to be 5 mm greater than the distance between the two cusp nadirs. The authors routinely use 1.5 inches (3.75 cm) or wider patch for every patient. Please note, this is a change from previous descriptions, as the wider patch allows for more extensive enlargement of the aortomitral curtain and ultimately larger valves.
In most cases, the author will pre-trim the patch (2 x 3 trimmed to 1.5 x 3 inches); however, this is not mandatory. As described herein, the suture line can begin at the nadir of the left coronary sinus, and after reaching the nadir of the noncoronary sinus, the patch can be trimmed at this point (as demonstrated in this video).
Recently, the authors have added the arc modification, which can be seen in the video. An arc was drawn on the short side of the patch, approximately 0.5-1 cm high and 2-2.5 cm wide, to create the triangular shape of the aortomitral curtain. This modification allows for more laxity in the patch to aortomitral curtain suture line, as some have described a ridge if this suture line is too tense. The peak of the Y at the cut edge of the aortomitral curtain was matched to the peak of the arc on the cut edge of the patch (1).
The patch was sewn to the aortomitral curtain from the left to right fibrous trigone with running 4-0 Prolene suture. The suture line was transitioned to the undermined aortic annulus at the nadir of both the left and noncoronary sinuses, sutured along the longitudinal length of the patch up to the level of the transverse aortotomy incision, and secured with additional 4-0 Prolene suture at the apex of each of the cut commissure posts.
The valve sizer was placed into the enlarged root, ensuring that the sizer was touching all three nadirs of the aortic annulus to appropriately determine the prosthesis size. With the valve sizer in place, the patch was stretched upward, and the position of the sizer was marked on the patch to guide the placement of subsequent valve sutures. This step was critical to prevent canting of the valve. It is important to ensure that the nadirs of the valve sizer are touching all three nadirs simultaneously and to draw the line accurately.
For valve positioning, once the prosthetic valve was on the field, it was placed within the enlarged root. In a tricuspid aortic valve, the left-right commissure served as the reference post. One strut was aligned with the left-right commissure, ensuring that both coronary ostia were not obstructed. Additionally, the surgeons checked that the marking for valve sutures on the patch aligned with the sewing ring of the prosthetic valve. The highest position of the valve sutures on the patch should be at the apex of the divided left noncommissure, and the same height of the valve sutures was maintained at the left-right and right noncommissures. Again, this was critical to ensure that the valve would be flat without any canting after the root was pressurized.
In the case of a bicuspid aortic valve, the authors align one strut of the prosthesis midway between the left and right coronary ostia. This alignment may or may not coincide with a raphe if present. The positioning of the strut between the ostia is then marked for reference later when passing valve sutures through the sewing ring.
Non-pledgetted 2-0 sutures were placed along the native aortic annulus in a noneverting fashion for bioprosthetic valves and mechanical valves. Along the patch, the sutures were placed from inside-outside-inside on the patch. For mechanical valves, pledgetted everting sutures are used.
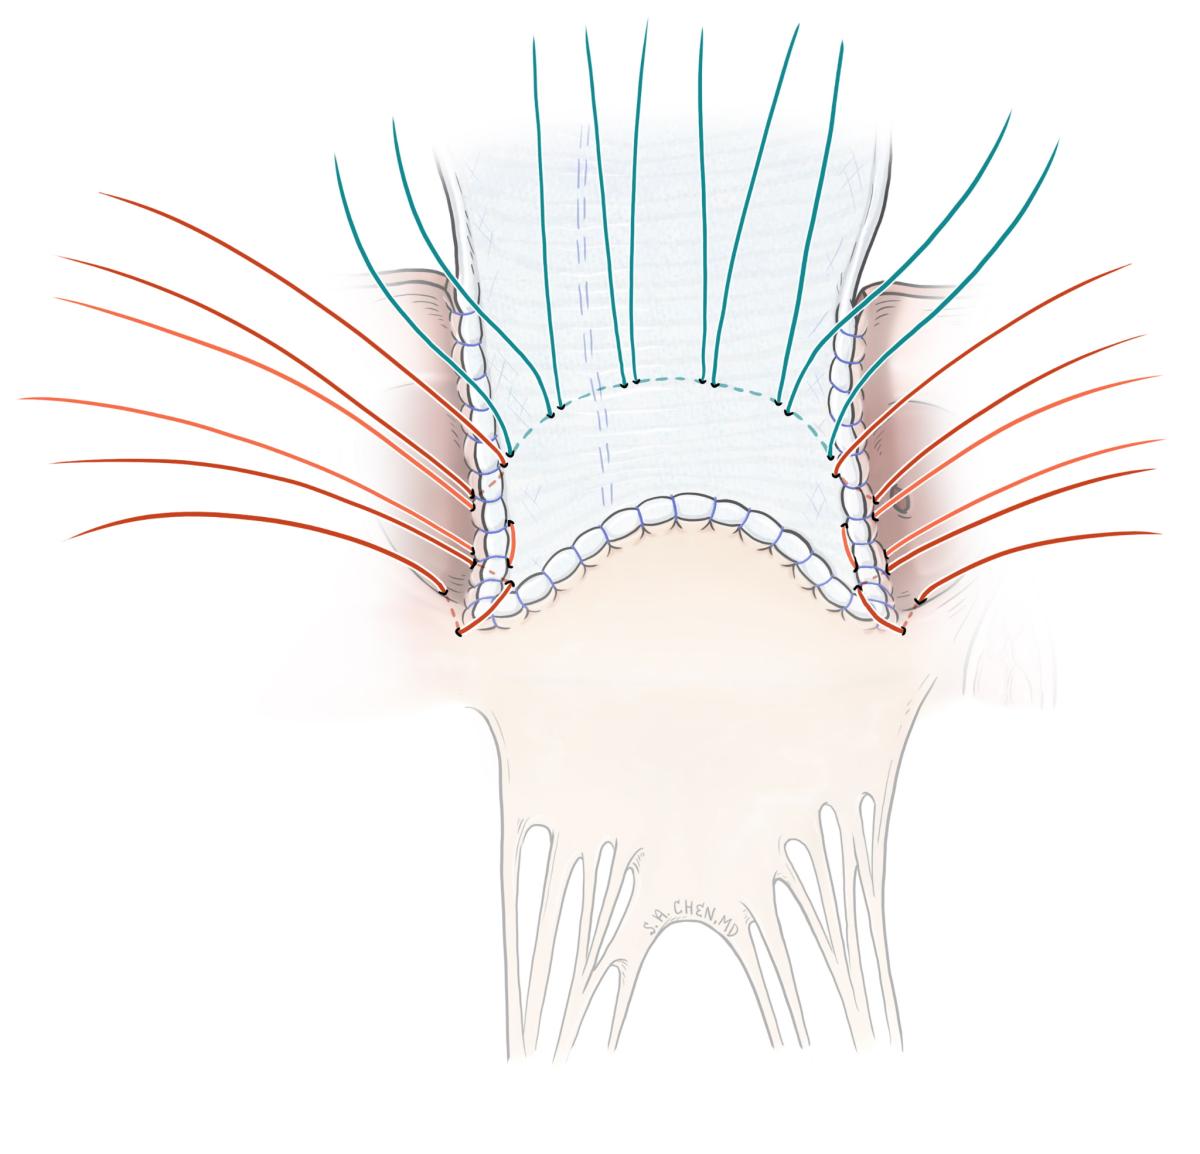
Figure 1A: Image of correct annular sutures.
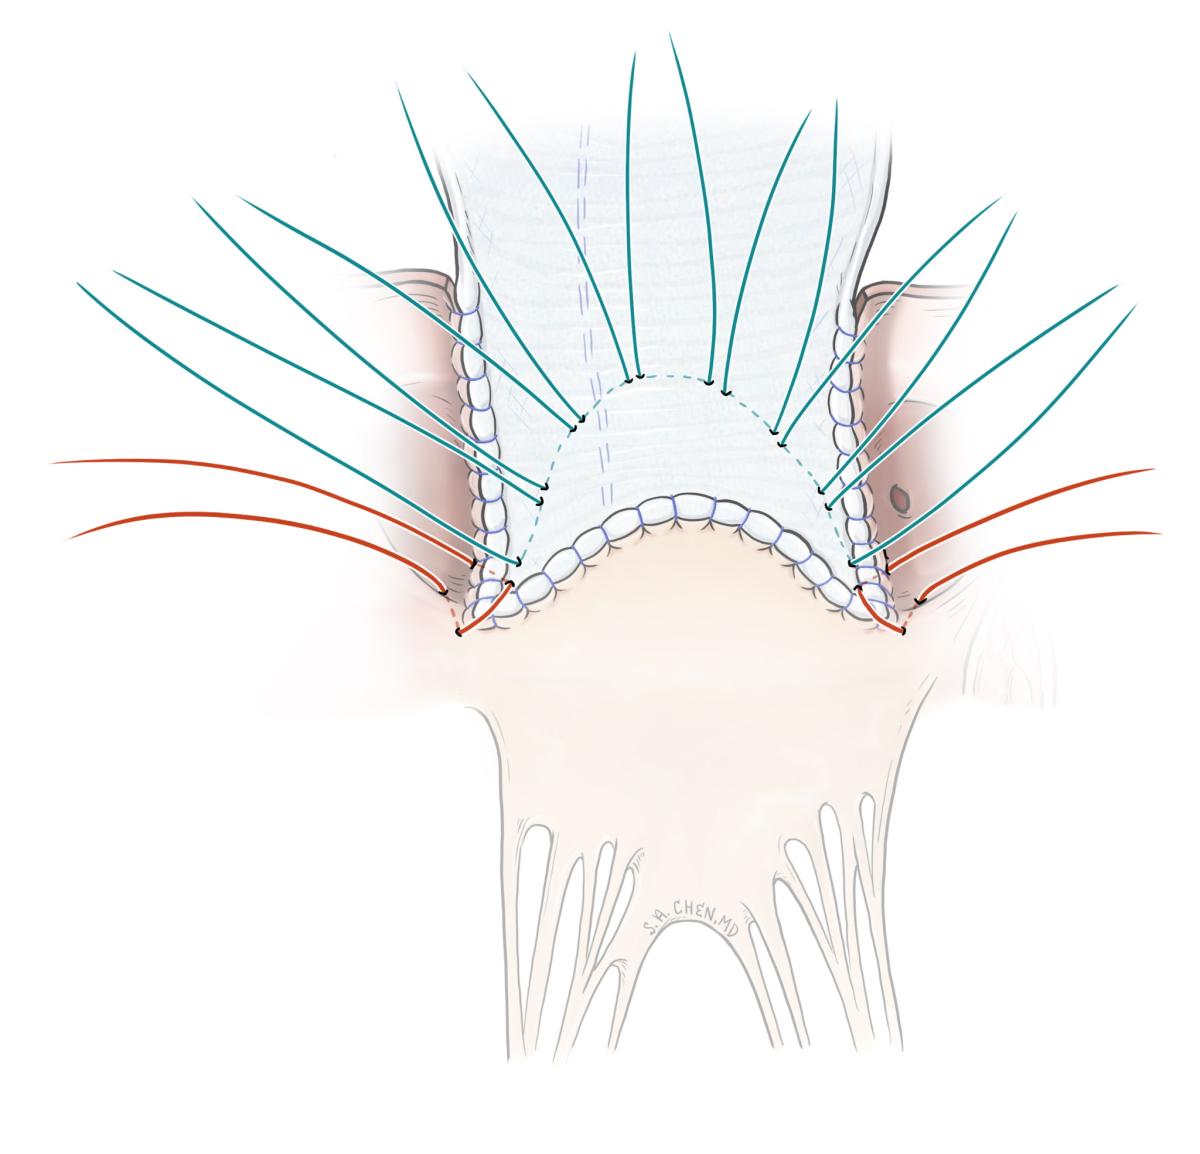
Figure 1B: Image of incorrect annular sutures.
The valve suture line marked over the sizer on the patch was shaped in a dome. It is worth reiterating that the highest position of the valve sutures on the patch should be at the same level as the apex of the divided left noncommissure, and the same height of the valve sutures was maintained at the left-right and right noncommissures. If the valve sutures on the patch are placed too low (significantly lower than the height of the divided left noncommissure), the upsizing is limited to 1-2 valve sizes. A large valve with low sutures could pinch the ostium of right coronary since the prosthetic valve tilts anteriorly and cephalad. Conversely, if the valve sutures on the patch are placed too high (significantly higher than the divided left noncommissure), the upsized valve could tilt posteriorly and cephalad, potentially blocking the left coronary ostium.
Transition stitches were made from the native annulus to the patch. There were six transition stitches (three mirrored stitches on each side of the patch). The first transition stitch involved one arm passing through the native annulus and the second arm going from the patch to the annulus; this stitch lies in the corner of the patch at the nadir. The second transition stitch was aligned vertically along the suture line from the patch to the annulus and traveled from the first transition stitch in the native annulus to the marked line on the patch. The third stitch began at the top of the prior transition stitch and exited on the patch along the marked line.
The valve sutures were divided equally into three and evenly distributed throughout the sewing ring of the prosthetic valve, per usual. The process began by first passing the valve suture at the left-right commissure through the sewing ring at the strut of the prosthesis. In a bicuspid valve, the valve suture was first passed at the previously marked location , which was midway between the two coronary ostia.
The authors find this step to be crucial, as inappropriate spacing of sutures in an enlarged root may result in the prosthetic strut obstructing coronary flow. The operator may notice that the strut is not positioned in the center of the patch; this is by design, as the positioning technique is intended to preserve coronary flow.
For seating the valve, the sutures were first tied at the nadirs of the noncoronary and left coronary sinuses, which are the lowest points of the aortic annulus. The remaining sutures were tied in sequence, per usual. Once seated, the operator would note through the prosthesis a portion of the patch between the sewing ring and the suture line of the patch to the aortomitral curtain. This area represented the enlargement to the aortomitral curtain, the anatomic aortic annulus, and the aortic root. The roof technique for closing the aortotomy was utilized for ascending aortas less than 35 mm, where a longitudinal aortotomy was made vertically at the posterior aspect of the proximal ascending aorta. The distal end of the rectangular patch was trimmed to a generous triangular shape, with the tip of the triangle positioned 2-3 cm above the level of the posterior strut. The aortotomy was closed with 4-0 Prolene by incorporating the triangular-shaped end of the patch into the longitudinal aortotomy, as previously described in the roof technique. For ascending aorta larger than 35 mm, the distal ascending aorta can be directly sewn to the proximal enlarged ascending aorta with a mild mismatch.
Preference Card
Prosthesis sizers should use the valve-shaped end of a sizer for all different types of prosthetic valves, including mechanical valves. A 2 x 3 inch small patch is recommended. For valve sutures, non-pledgetted 2-0 sutures should be used, along with 4-0 Prolene for patch and aortic closure, and 5-0 Prolene for suture line repair sutures.
Tips and Pitfalls
A complete transverse aortotomy is not required but is a very helpful maneuver for adequate exposure of the aortic annulus and for suturing of the patch closure. The authors have found this to provide the best alignment of the aortic root and ascending aorta after Y-incision AAE.
If the surgeon elects not to perform a complete transverse aortotomy with a rooftechnique closure, it is essential that the patch closure extends above the STJ, as this completes the root enlargement and allows for adequate coronary-to-valve distance in the event future valve-in-valve procedures are required.
Once the incision was carried through the leftnoncommissure post and you are under the annulus, it was essential to ensure that the tips of scissors arecurved toward the patient’s head to stay just under the annulus. This will allow the surgeon to hug the bottom side of the annulus and avoid cutting into the mitral valve. This incision aligned the suture line join the patch with the aortic annulus and aortomitral curtain, rather than with the aortic sinus tissue and mitral valve.
It is important to be sure to carry the incisions into the left and right fibrous trigones underneath the nadirs of the left and noncoronary cusps to maximize the enlargement. When nearing the nadirs, it is best to use small bites with the scissors to prevent accidentally cutting through the trigones.
Time should be taken to ensure a perfect suture line along the aortomitral curtain. Once the valve is seated it is very difficult to see this suture line again from outside the patch. The authors routinely place repair sutures in this suture line for any questionable areas immediately after completing it. These repair sutures are placed at dog ears and/or inconsistencies in suture spacing. Using a double-armed suture, inserted from inside to outside, and tying down on the outside of the patch is best, ensuring that the knots and suture tails are positioned away from the prosthesis and leaflets.
While suturing the edges of the patch to the annular tissue, it is important to keep the bites small but adequate to maximize the enlargement. Large bites will consume the patch and aortic sinus wall to make the enlargement smaller.
Utilizing the arc modification and matching the peak of the Y incision to the peak of the arc is helpful to allow laxity in the suture line. Over-tightening this suture line could create a band or ridge, resulting in an area for turbulent flow under the valve.
A common mistake is continuing the valve sutures from the native annulus onto the corner of the patch in a dome shape across the patch to the opposing corner and back to the native annulus. This results in a low suture line on the patch and minimal upsizing of the valve. Transitioning from the native annulus to the patch requires three transition stitches on each side. The first stitch went from the native annulus to the corner of the patch, the second was oriented vertically along the patch to the annulus suture line, and the third transitioned from the patch to the annulus suture line to the marked line on the patch.
Emphasis must be placed on the vertical transition stitch along the patch to annulus suture line. The vertical transition allowed the patch to bulge under the sewing ring, thus enlarging the aortomitral curtain and annulus. Again, these transition and patch stitches should not form a smooth arc or dome from corner to corner of the patch, as this will severely limit the enlargement.
Perivalvular leak is an uncommon event; however, the authors have noticed it is more likely to occur at the transition stitches at the nadirs. If too much travel is made in the transition stitch at the corner of the patch, this could create knuckling and an area of leak. After placing this suture, if the operator pulls up on each arm of the valve suture, the suture should lie flat across the corner of the patch. If the corner of the patch folds or knuckles, this suture should be replaced with less travel. Once the valve is seated, the surgeons use a nerve hook to check these areas (the nadirs of left and non-coronary sinus), and place repair sutures if needed. Typically, these repair sutures can easily be placed from within the prosthesis orifice due to the large valve size.
As crucial as it is to enlarge the annulus, it is equally critical to enlarge the STJ and ascending aorta using the roof technique to allow for future endovascular interventions. If a complete transverse aortotomy is not utilized, be sure to carry the patch above the level of the STJ during closure. The roof technique can also be used with a partial transverse aortotomy.
Disclosures
Drs. Ken Hassler and Bo Yang are both consultants for Edwards.
References
- Yang B. ATAS 2023: Techniques of Aortic Root Enlargement. wwwctsnetorg. https://www.ctsnet.org/article/atas-2023-techniques-aortic-root-enlargement
- Yang B. Mechanical AVR With Y-Incision Aortic Annular Enlargement. wwwctsnetorg. doi:https://doi.org/10.25373/ctsnet.19739392
- Yang, B. A Novel Simple Technique to Enlarge the Aortic Annulus by Two Valve Sizes. JTCVS Tech. 2021 Feb;5:13-16. Doi: 10.1016/j.xjtc2020.10.038. Epub 2020 Nov 5.
- Yang B. A “Y” Incision/Rectangular Patch to Enlarge the Aortic Annulus by 4 Valve Sizes in TAV and BAV Patients. Ctsnetorg. Published online April 15, 2021. doi:https://doi.org/10.25373/ctsnet.14408741
- Yang B, Naeem A, Palmer S. "Roof" technique-a modified aortotomy closure in Y-incision aortic root enlargement upsizing 3-4 valve sizes. JTCVS Tech. 2022;12:33-36. Published 2022 Jan 26. doi:10.1016/j.xjtc.2022.01.006
- Yang B, Ghita C, Makkinejad A, Green C, Wu X. Early outcomes of the Y-incision technique to enlarge the aortic annulus 3 to 4 valve sizes. J Thorac Cardiovasc Surg. 2022 Jul 16:S0022-5223(22).
- Hassler KR, Monaghan K, Green C, Yang B. How-I-Do-It: Aortic Annular Enlargement - Are the Nicks and Manouguian Obsolete? Seminars In Thoracic And Cardiovascular Surgery: Pediatric Cardiac Surgery Annual. Published online December 1, 2023. doi:https://doi.org/10.1053/j.pcsu.2023.12.005
- Yang B, Hassler KR, Chen S, Titsworth M, White N. "Arc" Modification of the Patch for the Y-Incision Aortic Annular Enlargement. Ann Thorac Surg Short Rep. 2024 Sep 27;3(1):14-17. doi: 10.1016/j.atssr.2024.09.008. PMID: 40098828
Disclaimer
The information and views presented on CTSNet.org represent the views of the authors and contributors of the material and not of CTSNet. Please review our full disclaimer page here.


